
What is dependency injection?
Dependency Injection (DI) is a design pattern that decouples an object from the instantiation of its dependencies. An object doesn’t need to know how to create its dependencies. Instead, we “inject” them to it.
In this context, we consider a dependency any other instance our object references and uses to fulfil its responsibilities. This concept applies not only to classes, but also to structs, and any other object that could reference another object.
It is important to decouple our object from its dependencies, so that:
- Each object becomes smaller and simpler, and making changes to them is easier, faster and less error prone.
- We could replace any object at any given time by a different object with a similar interface without affecting the entire system. This brings flexibility to the system design, and is generally considered a best practice.
Let’s introduce an example in order to fully understand what this means.
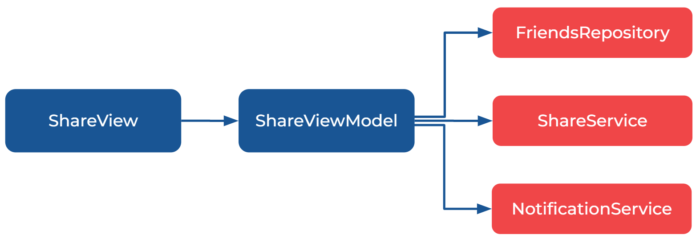
Imagine we have a social network app on which we can share posts with friends. If we were developing the Share screen, we would need to:
- Get a list of friends with whom we can share the post.
- Display a list of friends on the screen.
- Whenever a user row is clicked, share the post with them.
- When a post has been successfully shared with a user, or when sharing was unsuccessful, show a notification at the top of the screen with the result of the operation.
We could break down the responsibilities of this screen into different objects:
- ShareView: A SwiftUI View with a List component that displays the user’s friends. It’s also responsible for handling the user input. When a user clicks a friend row to share the post, it will pass the event to the ShareViewModel.
- ShareViewModel: An ObservableObject that maintains the ShareView state, gets the list of friends, and shares the post with a friend if the user has selected a row on the ShareView.
- FriendsRepository: A component responsible for fetching the user’s friends and returning asynchronously an array with them.
- ShareService: A component responsible for performing the actual logic for sharing a post with a friend.
- NotificationService: A utility class to show top level notifications in the UI.
Why is Dependency Injection important?
Now that we know which objects will compose our screen, it’s time to write some code. Normally, if we wanted to code the example above, this is what it would look like:
// MARK: - Dependencies
class FriendsRepository {
	func getFriends() async throws -> [User] { ... }
}

class ShareService {
	func share(_ post: Post, with user: User) async throws { ... }
}

class NotificationService {
	func showSuccess(message: String) { ... }
	func showError(message: String) { ... }
}

// MARK: - ViewModel
class ShareViewModel: ObservableObject {
	@Published var friends: [User] = []

	private let post: Post
	private let friendsRepository = FriendsRepository()
	private let shareService = ShareService()
	private let notificationService = NotificationService()

	init(post: Post) {
		self.post = post
	}

	func loadFriends() async {
		do {
			self.friends = try await friendsRepository.getFriends()
		} catch {
			self.friends = []
		}
	}

	func share(with friend: User) async {
		do {
			try await shareService.share(post, with: friend)
			notificationService.showSuccess(message: "Post shared with \\(friend.username)")
		} catch {
			notificationService.showError(message: "An error occurred")
		}
	}
}
Let’s leave the view for another time, and focus on where the actual logic lives. Here we have some basic structure for the dependencies, the implementation details for those don’t matter for us. The ShareViewModel implementation is almost complete. It does what it needs to do. It has a method called loadFriends that can be executed whenever the ShareView appears on the screen, and a method called share(with:) that should be called when a user taps on a friend row, or on a button.
However, there are some problems with this implementation. Consider the following cases:
- We would like to test our ShareViewModel. In its current state, testing would be very hard, since the dependencies are fixed and we can’t mock them. Testing the loadFriends method, for example, could trigger a real API call.
- It is impossible to reuse the ShareViewModel in contexts other than the original one for which the class has been developed. If we wanted to use different FriendsRepository depending on the screen this share flow has been triggered, that would be impossible if the dependencies are created within the ShareViewModel.
- In the case the ShareService or the FriendsRepository have complex init methods, the ShareViewModel would be responsible for deciding which arguments to pass to them, and that would lead to a class containing too many responsibilities.
The Dependency Injection pattern helps us overcome these issues by “injecting” (providing) the dependencies from the outside of the class. The ShareViewModel shouldn’t know which FriendsRepository subclass it needs to use, or how it should be configured.
Types of dependency injection
An important step before we use any type of Dependency Injection is to implement the dependencies as protocols and not as classes like we did above. In this case the implementation using protocols would look like this:
// MARK: - Interfaces
protocol FriendsRepository {
	func getFriends() async throws -> [User]
}

protocol ShareService {
	func share(_ post: Post, with user: User) async throws
}

protocol NotificationService {
	func showSuccess(message: String)
	func showError(message: String)
}

// MARK: - Concrete Implementations
class DefaultFriendsRepository: FriendsRepository {
	func getFriends() async throws -> [User] { ... }
}

class DefaultShareService: ShareService {
	func share(_ post: Post, with user: User) async throws { ... }
}

class DefaultNotificationService: NotificationService {
	func showSuccess(message: String) { ... }
	func showError(message: String) { ... }
}
There are many different types of dependency injection, each one with its own strengths. Let’s explore two of the most common alternatives for dependency injection in iOS: Init based DI and Container based DI. In this first part of our article we will look at Init based DI.
1. Init based DI
The most common and one of the simplest types of dependency injection involves providing the dependency during the initialization of the class.
Let’s see an example by refactoring the ShareViewModel implementation:
@Published var friends: [User] = []

	private let post: Post

	// Dependencies aren't instantiated in this class
	private let friendsRepository: FriendsRepository
	private let shareService: ShareService
	private let notificationService: NotificationService

	init(
		post: Post,
		// We 'inject' the dependencies in the init method.
		friendsRepository: FriendsRepository = DefaultFriendsRepository(),
		shareService: ShareService = DefaultShareService(),
		notificationService: NotificationService = DefaultNotificationService()
	) {
		self.post = post
		self.friendsRepository = friendsRepository
		self.shareService = shareService
		self.notificationService = notificationService
	}

	func loadFriends() async {
		do {
			self.friends = try await friendsRepository.getFriends()
		} catch {
			self.friends = []
		}
	}

	func share(with friend: User) async {
		do {
			try await shareService.share(post, with: friend)
			notificationService.showSuccess(message: "Post shared with \\(friend.username)")
		} catch {
			notificationService.showError(message: "An error ocurred")
		}
	}
}
An advantage of this approach is that the dependencies are not optional. This means that the object dependencies will have actual values when the object is initialized.
Note that each argument in the init has a default value, so when we need a ShareViewModel instance in the app, we can do:
let post: Post = ...
let viewModel = ShareViewModel(post: post)
There is no need to know how to get the dependencies in advance, so instantiating the class is as simple as it was before.
However, we could inject other dependencies if we needed. This can be useful in unit tests, for instance, or in case we would need to reuse the class in a different context. Let’s see how this can help us in writing good unit tests.
Unit Testing and dependency injection
Dependency injection is critical for effective unit testing.
Let’s test our ShareViewModel class. We would need to ensure that the following behaviours are true for it:
- Given the FriendsRepository returns a list of friends, when the ShareViewModel is requested to load friends, then the ShareViewModel’s friends property is updated with the friends returned by the FriendsRepository.
- Given the FriendsRepository throws an error, when the ShareViewModel is requested to load friends, then the ShareViewModel’s friends property is updated with an empty array.
- GIven the ShareService completes successfully, when the ShareViewModel is requested to share the post with a friend, then the NotificationService is used to display a success message.
- GIven the ShareService throws an error, when the ShareViewModel is requested to share the post with a friend, then the NotificationService is used to display an error message.
Pretty basic scenarios. Now, imagine we don’t use any type of dependency injection, and we have the entire functionality built into the class. It would be impossible to detect whether the ShareViewModel is working as we expect or not.
Now that we have described a way of implementing dependency injection, and that we are coding against interfaces and not against concrete implementations, we can use mocks instead of concrete implementations, in order to test the ShareViewModel.
A mock is an implementation of a dependency that is specifically designed to be used for testing. In this case, we can define the following mocks:
class MockFriendsRepository: FriendsRepository {
	// We can change the result of `getFriends`,
	// in order to test different scenarios.
	var getFriendsResult: Result<[User], Error> = .success([])

	func getFriends() async throws -> [User] {
		switch getFriendsResult {
			case let .success(friends): return friends
			case let .failure(error): throw error
		}
	}
}

class MockShareService: ShareService {
	// We can force the share function throw an error
	var shareError: Error?

	func share(_ post: Post, with user: User) async throws {
		if let error = shareError {
			throw error
		}
	}
}

class MockNotificationService: NotificationService {
	// We can also register how many times
	// a function is being called
	var showSuccessCallCount = 0
	var showErrorCallCount = 0

	func showSuccess(message: String) {
		showSuccessCallCount += 1
	}

	func showError(message: String) {
		showErrorCallCount += 1
	}
}
These can get more complicated if we needed. We could, for instance, register the arguments used to call the methods on these mocks. In this case, let’s keep it simple.
Unit testing using Init based DI
For init based DI, the testing process is simple. We can instantiate mock dependencies and recreate them every time a test case is run (in the setUp function).
The viewModel is instantiated with mock variants of its dependencies, and those mocks are saved in variables within the XCTestCase subclass.
import XCTest
@testable import DIExampleApp

class ShareViewModelTests: XCTestCase {
	enum TestError: Error {
		case testCase
	}

	private let post = Post(id: 1234)

	// We save references to the mocks
	private var friendsRepository: MockFriendsRepository!
	private var shareService: MockShareService!
	private var notificationService: MockNotificationService!

	private var viewModel: ShareViewModel!

	override func setUp() {
		super.setUp()

		// Mocks are regenerated with each test run
		friendsRepository = MockFriendsRepository()
		shareService = MockShareService()
		notificationService = MockNotificationService()

		// The view model is instantiated with mocks,
		// instead of actual dependencies.
		viewModel = ShareViewModel(
			post: post,
			friendsRepository: friendsRepository,
			shareService: shareService,
			notificationService: notificationService
		)
	}

	func testLoadFriendsSuccess() async {
		// GIVEN
		let friends = [
			User(id: 1),
			User(id: 2),
			User(id: 3)
		]

		// We can configure the mock to test different scenarios.
		friendsRepository.getFriendsResult = .success(friends)

		// WHEN
		await viewModel.loadFriends()

		// THEN
		XCTAssertEqual(viewModel.friends, friends)
	}

	func testLoadFriendsFailure() async {
		// GIVEN
		friendsRepository.getFriendsResult = .failure(TestError.testCase)

		// WHEN
		await viewModel.loadFriends()

		// THEN
		XCTAssertEqual(viewModel.friends, [])
	}

	func testShareSuccess() async {
		// GIVEN
		shareService.shareError = nil // Not needed, added for clarity

		// WHEN
		await viewModel.share(with: User(id: 1))

		// THEN
		XCTAssertEqual(notificationService.showSuccessCallCount, 1)
	}

	func testShareFailure() async {
		// GIVEN
		shareService.shareError = TestError.testCase

		// WHEN
		await viewModel.share(with: User(id: 1))

		// THEN
		XCTAssertEqual(notificationService.showErrorCallCount, 1)
	}
}
In Part 2 of the Dependency Injection in iOS Applications article, we will discuss Container-based dependency injection.
